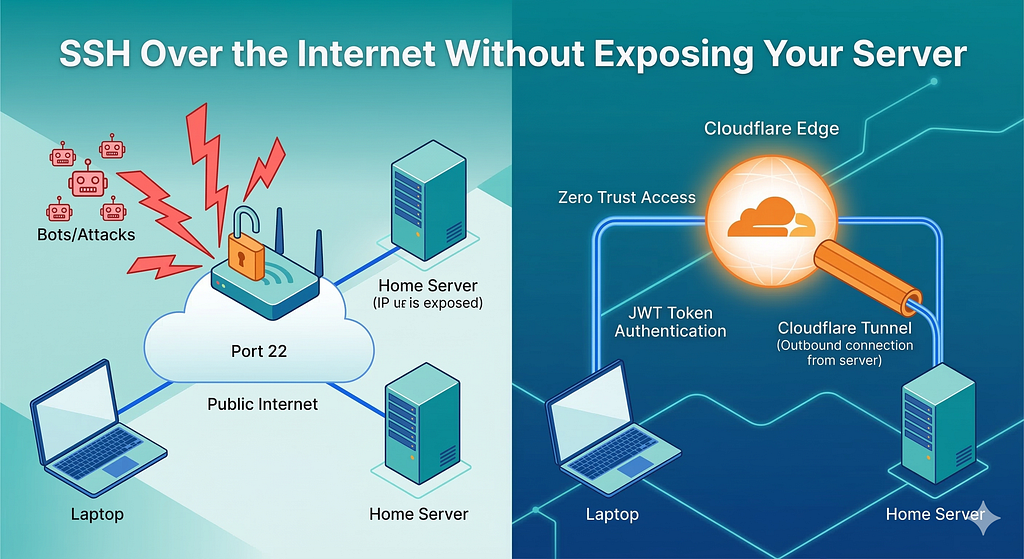
You want SSH access to your home server from anywhere in the world. The naive approach — opening port 22 on your router — works, but it exposes your machine directly to the internet. Every automated scanner, brute-force bot, and opportunistic attacker can reach it.
There’s a better way. This guide walks through setting up SSH access using Cloudflare Tunnels and Cloudflare Zero Trust Access. No open ports. No exposed IP. Authentication enforced before the SSH prompt even appears.
What Problem Are We Solving?
Traditional remote SSH requires:
- A public IP address
- Port 22 open and forwarded on your router
- Your server directly reachable from the internet
Cloudflare Tunnels flip this model. Your server connects out to Cloudflare. Traffic flows through that outbound connection, so your server’s IP is never exposed and no inbound ports are needed.
Architecture
┌────────────────────────────────────────────────────────────────────────┐
│                         YOUR CLIENT MACHINE                            │
│                                                                        │
│   ssh user@ssh.yourserver.com                                          │
│         │                                                              │
│   ~/.ssh/config: ProxyCommand cloudflared access ssh --hostname %h    │
│         │                                                              │
│   cloudflared (local) ──── HTTPS/WebSocket ────►                      │
└─────────────────────────────────────────────────┼──────────────────── ┘
                                                  │
                                    ┌─────────────▼──────────────┐
                                    │      CLOUDFLARE EDGE        │
                                    │                             │
                                    │  ┌─────────────────────┐   │
                                    │  │  Zero Trust Access   │   │
                                    │  │  (Authentication)    │   │
                                    │  │  Email + OTP check   │   │
                                    │  └──────────┬──────────┘   │
                                    │             │               │
                                    │  ┌──────────▼──────────┐   │
                                    │  │  Cloudflare Tunnel   │   │
                                    │  │  (Routing)           │   │
                                    │  └──────────┬──────────┘   │
                                    └─────────────┼──────────────┘
                                                  │
                                    ┌─────────────▼──────────────┐
                                    │       YOUR SERVER           │
                                    │                             │
                                    │  cloudflared (daemon)       │
                                    │  ── outbound connection ──► │
                                    │                             │
                                    │  sshd (localhost:22)        │
                                    └─────────────────────────────┘Code language: CSS (css)
Traffic never hits your server’s IP directly. The only connection that matters is the one your server makes outward to Cloudflare.
What Is What
Cloudflare
The company and CDN network. Sits between the internet and your server. Provides DNS management, DDoS protection, and the Zero Trust platform. You need a domain managed by Cloudflare for this to work.
Cloudflare Tunnel (formerly Argo Tunnel)
A persistent outbound connection from your server to Cloudflare’s edge. Created and managed by the cloudflared daemon. The tunnel is registered to your Cloudflare account and given a unique ID. DNS records point your hostname to this tunnel ID, so Cloudflare knows where to route incoming traffic.
cloudflared
The daemon (binary) that does the actual work on both sides:
- On your server: runs as a systemd service, maintains the outbound tunnel connection to Cloudflare, and proxies traffic to local services (like sshd on localhost:22).
- On your client machine: invoked as a ProxyCommand by SSH, wraps your SSH session in a WebSocket and routes it through Cloudflare to reach the tunnel.
Cloudflare Zero Trust Access
The authentication layer that sits in front of your tunnel. Before any traffic reaches your server, the user must authenticate through Cloudflare Access. You define who is allowed in (email addresses, OTP, Google login, etc.) and Cloudflare enforces it at the edge. Think of it as a bouncer in front of the tunnel.
SSH Config ProxyCommand
The glue on your client machine. Instead of SSH connecting directly to the server, it spawns cloudflared access ssh –hostname <your-hostname> as a proxy process. SSH sends and receives through that process, which handles the WebSocket tunnel. The end result feels exactly like regular SSH.
Prerequisites
- A domain managed by Cloudflare (DNS settings → Nameservers pointing to Cloudflare)
- A Cloudflare account (free tier is sufficient)
- Zero Trust enabled on your account (free for up to 50 users)
- cloudflared installed on your server
- cloudflared installed on your client machine
- SSH server running on your server (sshd)
- Your server has outbound internet access (even behind NAT)
Key Constraint: Subdomain Depth
Cloudflare’s free Universal SSL certificate covers *.yourdomain.com — one level of subdomain. It does not cover *.*.yourdomain.com or deeper. If your hostname is more than one level deep (e.g., ssh.server.node.yourdomain.com), Cloudflare can’t issue a TLS certificate for it on the free plan, and the tunnel will fail with a TLS handshake error.
Use a single-level subdomain:
✓  yourserver.yourdomain.com
✓  ssh-mypi.yourdomain.com
✗  ssh.pi5.201.yourdomain.com   ← TLS handshake failure on free planCode language: CSS (css)
Step-by-Step Setup
Step 1: Install cloudflared on Your Server
# Download and install (Debian/Ubuntu ARM64 for Raspberry Pi)
curl -L https://github.com/cloudflare/cloudflared/releases/latest/download/cloudflared-linux-arm64 \
  -o /usr/local/bin/cloudflared
chmod +x /usr/local/bin/cloudflared
cloudflared --versionCode language: PHP (php)
Step 2: Authenticate cloudflared with Cloudflare
cloudflared tunnel loginThis opens a browser link. Visit it, select your domain, and authorise. A certificate is saved to ~/.cloudflared/cert.pem. This proves to Cloudflare that you own the account.
Step 3: Create the Tunnel
cloudflared tunnel create my-server-tunnelNote the tunnel ID printed (format: xxxxxxxx-xxxx-xxxx-xxxx-xxxxxxxxxxxx). A credentials JSON file is created at ~/.cloudflared/<tunnel-id>.json. This file is the secret that authenticates your server to the tunnel — keep it secure.
Step 4: Configure the Tunnel
Create (or edit) /etc/cloudflared/config.yml:
tunnel: <your-tunnel-id>
credentials-file: /home/<your-user>/.cloudflared/<your-tunnel-id>.json

ingress:
  - hostname: yourserver.yourdomain.com
    service: ssh://localhost:22
  - service: http_status:404   # catch-all — required, must be lastCode language: HTML, XML (xml)
Important: the ingress rules are evaluated top-to-bottom. The catch-all http_status:404 must always be the final entry.
Step 5: Create the DNS Record
Route the hostname to your tunnel. cloudflared will create the CNAME record in Cloudflare DNS automatically:
cloudflared tunnel route dns my-server-tunnel yourserver.yourdomain.comCode language: CSS (css)Verify in Cloudflare Dashboard → DNS. You should see:
CNAME yourserver <tunnel-id>.cfargotunnel.com ProxiedCode language: CSS (css)Step 6: Install cloudflared as a Systemd Service
sudo cloudflared service install
sudo systemctl enable cloudflared
sudo systemctl start cloudflared
sudo systemctl status cloudflared
The service uses /etc/cloudflared/config.yml — confirm this is the config path in the service output (look for –config in the process arguments).
Step 7: Create the Cloudflare Access Application
In Cloudflare Dashboard → Zero Trust → Access → Applications → Add an application:
- Choose Self-hosted
- Application name: anything descriptive (e.g. “My Server SSH”)
- Application domain:
-> Subdomain: the subdomain part (e.g. yourserver)
-> Domain: your root domain
-> This must match exactly the hostname in your tunnel config - Browser rendering: SSH — this enables SSH proxying
- Session duration: your preference (24h is reasonable)
- Click Next
Step 8: Add an Access Policy
On the Policies tab:
- Policy name: e.g. “Allow me”
- Action: Allow
- Configure rules → Include:
* Selector: Emails
* Value: your email address - Save
Without a policy, Access defaults to blocking everyone. The policy defines who can authenticate.
Step 9: Install cloudflared on Your Client Machine
# macOS
brew install cloudflared

# Linux
curl -L https://github.com/cloudflare/cloudflared/releases/latest/download/cloudflared-linux-amd64 \
  -o /usr/local/bin/cloudflared
chmod +x /usr/local/bin/cloudflaredCode language: PHP (php)
Step 10: Configure SSH on Your Client
Add to ~/.ssh/config:
Host yourserver.yourdomain.com
    ProxyCommand cloudflared access ssh --hostname %h
    User your-usernameCode language: CSS (css)
Step 11: Authenticate and Connect
First-time authentication:
cloudflared access login yourserver.yourdomain.comCode language: CSS (css)A browser opens. Log in with your email. Cloudflare sends an OTP. Authenticate. A token is saved locally — you won’t need to do this every session.
Then SSH as normal:
ssh yourserver.yourdomain.comCode language: CSS (css)Things to Get Right
These are the most common places to go wrong. Getting them right the first time saves a lot of debugging.
Subdomain depth: Use a single-level subdomain only. Free Cloudflare SSL does not cover *.*.yourdomain.com. If you get a TLS handshake failure, this is the first thing to check.
Two config files: cloudflared has two possible config locations — ~/.cloudflared/config.yml (user) and /etc/cloudflared/config.yml (systemd service). The systemd service reads the /etc/ path. Always verify which file the service is using by checking systemctl status cloudflared for the –config flag. Edits to the wrong file have no effect.
Hostname match: The hostname in config.yml, the DNS CNAME record, and the Cloudflare Access application domain must all match exactly. A mismatch anywhere in this chain breaks the connection.
Catch-all rule: cloudflared requires the last ingress rule to be a catch-all with no hostname. Without it, the service fails to start.
Access policy assigned: Creating the Access application without adding a policy means nobody can get in. Policy assigned: 0 = everyone blocked.
Access app hostname updated: If you rename a hostname, update the Access application to match. The application is tied to a specific hostname — it won’t apply to a renamed one.
cloudflared on both ends: The ProxyCommand requires cloudflared installed on the client. If it’s missing, SSH falls back to a direct TCP connection and fails. The error looks like a TLS handshake failure, not “cloudflared not found”.
IPv6 without connectivity: If your network advertises IPv6 addresses but has no IPv6 route to the internet, cloudflared will prefer IPv6 and fail with “no route to host”. Fix by adding edge-ip-version: 4 to ~/.cloudflared/config.yml on the client machine.
Restart after config changes: cloudflared reads config at startup. Changes to /etc/cloudflared/config.yml require sudo systemctl restart cloudflared to take effect.
Debugging Checklist
Work through this list top-to-bottom when SSH isn’t connecting.
1. DNS resolving?
   dig yourserver.yourdomain.com @1.1.1.1
   → Should return two Cloudflare A records (104.x.x.x and 172.x.x.x)
   → If not: check cloudflared tunnel route dns was run, check DNS tab in Cloudflare

2. System DNS resolving?
   ping yourserver.yourdomain.com
   → If dig works but ping fails: local DNS cache issue
   → macOS: sudo dscacheutil -flushcache && sudo killall -HUP mDNSResponder
   → Pi-hole: pihole restartdns

3. cloudflared installed on client?
   which cloudflared
   cloudflared --version
   → If not found: ProxyCommand silently fails, SSH attempts direct TCP → TLS error

4. SSH config correct?
   cat ~/.ssh/config
   → Host line must match the hostname you're SSHing to exactly
   → ProxyCommand must reference cloudflared access ssh --hostname %h

5. IPv6 issue?
   cloudflared access ssh --hostname yourserver.yourdomain.com
   → "no route to host" on an IPv6 address: add edge-ip-version: 4 to ~/.cloudflared/config.yml

6. Access application exists?
   Cloudflare Dashboard → Zero Trust → Access → Applications
   → Application must exist for this exact hostname
   → "failed to find Access application" error = missing or wrong hostname

7. Policy assigned?
   Click the application → Policies assigned: must be > 0
   → 0 policies = everyone blocked

8. Authentication token valid?
   cloudflared access login yourserver.yourdomain.com
   → Should open browser and return "Successfully fetched your token"
   → If browser doesn't open: visit the URL manually

9. Tunnel running on server?
   sudo systemctl status cloudflared
   → Must show: Active: active (running)
   → Check for "Registered tunnel connection" in recent logs

10. Correct config file on server?
    sudo systemctl status cloudflared | grep config
    → Note the --config path in the process arguments
    sudo cat /etc/cloudflared/config.yml
    → Must contain the correct hostname and credentials-file path

11. Credentials file accessible?
    ls -la /home/<user>/.cloudflared/<tunnel-id>.json
    → File must exist and be readable by the cloudflared process user

12. SSH running on server?
    sudo systemctl status ssh
    → Must show: Active: active (running)

13. Hostname in tunnel config matches Access app?
    Config hostname = DNS record = Access application domain
    → All three must be identicalCode language: PHP (php)
How Authentication Works
Client                    Cloudflare Edge              Server
  │                             │                         │
  │── ssh yourserver.com ──────►│                         │
  │                             │                         │
  │◄── Redirect to auth ───────│                         │
  │                             │                         │
  │── Email + OTP ─────────────►│                         │
  │                             │                         │
  │◄── JWT token ──────────────│                         │
  │                             │                         │
  │── SSH + JWT ───────────────►│── WebSocket → Tunnel ──►│
  │                             │                         │
  │◄─────────────────── SSH session ──────────────────────│Code language: CSS (css)
The JWT token is cached by cloudflared on your client machine. Subsequent connections within the session duration don’t re-prompt for authentication.
Security Properties
PropertyValueServer IP exposed to internetNoPort 22 open on routerNot requiredAttack surfaceOnly Cloudflare’s edgeAuthentication requiredYes — email + OTP before SSH promptDDoS protectionCloudflare’s networkBrute-force exposureNo — auth happens before server is reachedCostFree (up to 50 users)
What This Replaces
- Port forwarding on your router
- Dynamic DNS services
- VPN server on your home network (for SSH access only)
- Bastion hosts / jump boxes
Limitations
- Requires cloudflared on every client device you SSH from
- Depends on Cloudflare’s infrastructure availability
- Session token auth flow requires a browser on first use per device
- Deep subdomains (more than one level) require Cloudflare’s paid Advanced Certificate Manager
Summary
The full chain that makes this work:
- cloudflared on server — maintains outbound tunnel to Cloudflare, proxies traffic to sshd
- DNS CNAME — points your hostname to the tunnel ID
- Cloudflare Access application — defines the hostname and enables SSH browser rendering
- Access policy — defines who is allowed to authenticate
- cloudflared on client — wraps SSH in WebSocket via ProxyCommand
- ~/.ssh/config ProxyCommand — routes SSH through cloudflared transparently
Every piece is required. The most common failures are a mismatch between these pieces — wrong hostname in one of the three places, wrong config file being read by the service, or a missing policy.
Guide based on a working setup: Raspberry Pi 5 running Ubuntu 24.04, microk8s, cloudflared 2026.3.0, accessed from macOS via Cloudflare Zero Trust.
SSH Over the Internet Without Exposing Your Server — Cloudflare Tunnels + Zero Trust Access was originally published in Dev Genius on Medium, where people are continuing the conversation by highlighting and responding to this story.
Leave a Reply